Helloooo!!!

This post is an old design I did back a couple of months ago, but I never got around to posting it for some reason.  The photos are a bit blurry and crap, but it was one of my first tries, and I think I’m getting better… aren’t I?

Anyway, I wore this design to SOUNDWAVE! I got to see Avenges Sevenfold and Trivium for the second time live, and for the first time I got to see Rob Zombie, Korn and Volbeat.  It was AMAZEBALLS and I had an awesome day.

14323099143_8a653f95c1

Ok, so lets get on with the design.  After prepping your nails with your usual base coat, use a black polish for a French Tip.  I use guide stickers for my tips, but if you’re steady enough you can free hand it.  I used a new polish which was supposed to be holographic, but in all honesty it just looked sparkly.  I was a bit disappointed 😦

12805940145_43ec56c51e_n

Next you need a blue polish and a fine nail art brush.  Use the nail art brush to paint a thin line along the edge of your black tips.

12806354204_eae2dc58b9_n

You could finish there, but as I was going to a music festival I wanted to snazz it up a bit.  So I used some nail art decal stickers which I got from a market a few years ago.

12806357724_da6f8a247c_n

Using tweezers, I placed decals on my thumb nails and ring fingernails.

12805957855_dcf1b24bc8_n

12806047043_e01f4dafaf_n

Make sure you finish with a top coat to seal in your design and help those decal stickers last longer.

12806054193_1f41f447cf_n

And that’s it!  As always, you can change it up with different colours.  Sorry again for the crappy photos.  Hope you like the design, and thanks again for reading my blog!

Love from Michelle xox

If you decide to recreate this design, please share it with me on my social media pages.

Facebook:  /michellesmanis

InstaGram: @michellebm6

Disclaimer: All products used in this blog were purchased by me with my own money. I am not affiliated with any of the companies mentioned nor am I getting paid to use the products. All opinions are 100% my own.

Hi everyone!

Hope you are all keeping well.  This nail design was actually inspired by one of my favourite nail art YouTubers, Collette from My Simple Little Pleasures.  She got the inspiration originally from Pintrest!  It’s a simple design to do, and great for those of you wanting an easy step into fancy nail art.

14026357182_a6ac4b0e67

What you will need:

  • 2 nail polish colours (I use black and red but you can use whatever you like)
  • a makeup sponge
  • cotton tips
  • nail polish remover
  • your usual base and top coats

How did I do it?

After preparing your nails with a base coat, paint all of your nails with red polish.

14006394606_7db629a7a8

If you want to use a different colour combination, be sure to put the lighter colour on first.  Otherwise, if you try putting the lighter colour on over the top of the darker colour, it will show through and wont look super mega awesome.

After your base colour has dried, use an old makeup sponge and place the black and red on the sponge like shown.

14026355471_f2cf08d9ba

You are now going to dab this onto your nails, with the darker colour (in my case, black) going on the tip of your nail.  After each nail, reapply some polish to the sponge to get the best coverage.

I did 2 coats of this on my nails, and this is what it ended up looking like…

14049562533_b052046dc0

What a pretty mess!!

Now you’re going to dip your cotton buds into nail polish remover and wipe away all the polish from your fingertips.  Then, finish with a top coat to seal in your design!

14029970674_b4af810c9a

I love this colour combination.  I think this would look great with purple or blue with black tips.  You could also make a sunset ombre look by having yellow turn into orange/red.  The options are endless!

A handy tip…

When you’re finished with your design, instead of throwing out your makeup sponge, just cut off the area you used and then you can keep it for the next sponging design you want to try!

14006381756_b9c3621c30

If you decide to recreate this design, please share it with me on my social media pages.

Facebook:  /michellesmanis

InstaGram: @michellebm6

Thanks for checking out my blog!

Love from Michelle xox

Disclaimer: All products used in this blog were purchased by me with my own money. I am not affiliated with any of the companies mentioned nor am I getting paid to use the products. All opinions are 100% my own.

Hey everyone!

Yes, I realise this post is waaayyy later than it should be, but I do have an excuse.  My Valentines Day didn’t turn out to be what I hoped it would, and after I had done my nails I suddenly became very single again.  So, as you can imagine, I didn’t want to even think about Valentines Day, and even ended up spending the day in my pyjamas, playing The Sims 2 all day 😀

So, now that I’ve recovered and I’m getting on with life, I have a Valentines Day look for you which you could definitely use at any time of the year.

13

WHAT YOU WILL NEED:

01

As always you need a base coat and a top coat.  You’ll also need a pink polish for your French tip.  I also used a sheer pink as a base colour, but this is optional.

You’ll also need a red and white stamping polish and stamping plates and tools (which aren’t pictured here, oops!).  I also used little guide stickers for my French tips, but if you have a steady hand you can skip using these and just free hand it.

HOW DID I DO IT?

First up, prep your nails by cleaning and filing to your desired shape.  Then add your base coat to protect your natural nail.

02

The next step is optional, but I think it gives the design a more professional look.  Use a sheer French pink polish on all of your nails as a base colour.  You can hardly see the difference, but I’ll post a picture anyway 🙂

03

Now we can do our pink French tips.  I use these guide stickers, but as I mentioned before, if you have a steady hand then you can skip using these.

04

Once you’ve placed your stickers where you want them, go ahead and paint the tip of your nail with a pink polish.

05

I did two coats of the pink before removing the stickers.

06a

06

Now it’s time for our stamping!  The stamping plate I’m using has a cute kiss shape on it…

07

I got this plate from the BornPretty Store.  I didn’t want the writing underneath, so I just placed the polish on the kiss.  Using a white stamping polish, place some kisses randomly over your nails.

08

Then do the same thing with a red stamping polish.

09

I alternated using the red and white stamping polishes so I could get the kisses of different  colours overlapping each other.  Your finished look should look something like this…

10

There is no right or wrong way to do this design.  I was originally going to go for a neat organised look, but kisses just look so much better when they are random and all over the place, don’t you think?!

You could also add something different.  On my other nail I used this stamping plate…

11

It’s hard to see, but the pattern says I ❤ You.  I really wanted the heart to be red and the writing white, and this took me  3 goes to get it right! So, I only did it once!

12

Finish your design with a top coat, and that’s it!

If you don’t have stamping plates, you could easily replace the kisses with hearts hand drawn using a dotting tool, or even decal stickers which you can find in so many places.

Thanks for checking out my blog!!

Love from Michelle xox

Disclaimer: All products used in this blog were purchased by me with my own money. I am not affiliated with any of the companies mentioned nor am I getting paid to use the products. All opinions are 100% my own.


G’day everyone!

So… who’s managed to get the Australia Day long weekend off work?  I’ve been rostered on to work, so not too much frivolity for me!

For those of you who are unaware of what Australia Day is, it is the official national day of Australia.  Celebrated annually on the 26 January, it marks the anniversary of the 1788 arrival of the First Fleet of British ships at Sydney Cove, New South Wales, and the raising of the flag of Great Britain at that site by Governor Arthur Phillip.  So, it’s pretty much a long weekend where everyone has a barbecue, listens to Triple J’s Hottest 100, lounges around in a blow up pool, and drinks way too much.  Yay!

Whether you have an Australia Day party to go to or not, this nail art design is to get you in the patriotic spirit!

Aussie Aussie Aussie!! OI OI OI!!!

01

WHAT YOU WILL NEED:

02

  • Your favourite base coat and top coat
  • Green, Yellow and White nail polish
  • Green and Gold sparkly nail polish
  • White stamping polish, to use with your stamping plate, stamper and scraper
  • (If you don’t have any stamping stuff, you can either free hand the stars, or use nail art decals)
  • A striping brush and some tape (I used masking tape)

HOW DID I DO IT?

First, start by filing, cleaning and shaping your nails.  Then, apply your base coat to protect your nails.

03

Then, using a white polish, paint the nail on your ring finger.  This will be where our Union Jack goes.

04

On my thumbs I used the tape to create a funky green and gold French tip.  First, use the tape to corner off a section of your thumb nail, and paint that yellow.

11

Carefully remove the tape before the polish dries.  Otherwise, the tape will pull off the polish with it!

12

While you wait for that to completely dry, paint the rest of your nails.  Paint your pointer and pinky green, and your middle finger yellow.

13

Now back to the thumb.  Tape off the other corner of your nail…

14

… And paint that section green…

15

Slooooowly take the tape off and…

16

… You have yourself a green and gold French tip!  Yay!

I had no idea how I was going to do the Union Jack when I started, so I ended up using 2 different techniques on each hand.  My first attempt was using tape as a guide.

Start by cutting some tape into thin strips…

05

… and place them on your nail to block off the area which needs to stay white.  We then go over this with our yellow polish, and then carefully remove the tape before it dries.

06

I forgot to take a photo of the nail with just the yellow (SORRY!!), but your next step is to get your striping brush, dip it in your green polish, and CAREFULLY draw the crossing lines.

07

The big cross in the middle connects in the centre, and the thinner cross behind that doesn’t touch the thicker lines.  Embarrassingly, I had to look at a photo of the Union Jack to make sure I got it right… but when in doubt you should always use a guide!!

Now, this method didn’t turn out as awesome as I had hoped, so I just went full freestyle on my right hand.  Yes, that means I painted it with my left hand… my non-dominant hand… my gumby hand… and it turned out better!

I started with the green polish this time, and using my striper brush I painted the thick cross in the middle.

08

Then I added the thinner cross “behind” the thick one.  Make sure those lines don’t touch!

09

Then, give your striper a good clean (or use another one if you have it), and dip that in the yellow polish.  Carefully paint in the white spaces to create the background, making sure there is still a white outline around the green lines.

10

Ta da!  Doesn’t that look better?!  You may find the other technique easier, but it’s all about trial and error when trying new things!  Don’t worry about clean up… I usually save that to the end.

Next you’ll need your green and gold glitter polishes.  Paint the green glitter over the yellow polish on your middle finger, and the gold glitter over the green polish on your index finger.

17

It doesn’t matter if your glitter polishes are different.  I quite liked that the gold glitter was chunkier.

I used a stamping plate which I got from the Born Pretty Store (it’s online, Google it!) for my pinky.  I used the starry pattern to finish off the “flag”.

18

If you havent used stamping plates before, you can find plenty of tutorials on YouTube.  Watching it done would probably be more helpful than just reading how to do it, but I’ll tell you anyway.

Paint a blob of polish over the design you want to use.  Then, using a scraper, scrape away the excess polish.  This will leave only the polish sitting in the engraved design.  Use a stamper to pick up the polish by placing the stamp end over the design and pushing down in a rolling motion.  When you lift the stamper up, you will see the design sitting nicely on the end of the stamper.  Once again using a rolling motion, place the design onto your nail making sure it’s at the right angle you want.  When doing this you will want to work quick otherwise the polish will dry before you can transfer it onto your nail.  (I’d suggest turning any fans off when you do this.) The end result is this…

19

Last but not least, finish with a top coat over all your nails to make your designs last longer.  Then clean up around the edges, and there you have it!  Your very own Green and Gold Aussie nail design!

2021

Thank you very much for reading this blog.  I hope all you Australians have a fantastic Australia Day weekend, and if your not in Australia, just have a good weekend anyway!

Love from Michelle xx

Disclaimer: All products used in this blog were purchased by me with my own money. I am not affiliated with any of the companies mentioned nor am I getting paid to use the products. All opinions are 100% my own.

Hello everyone.. and HAPPY NEW YEAR!

I must first apologise for this blog being so blank.  One of my new years resolutions is to blog more, and I’m hoping to have a new nail art design for you every fortnight.  I do work 2 jobs, so hopefully I can fit nails into that as well!

I know it’s a bit late, but I wanted to share with you my nail design I wore for New Years Eve.  It’s a sparkly, fireworks inspired design, and I got to use my brand new Konad stamping plates and polish which I got for Christmas! Yay!  Here’s the design I came up with:

11881668733_0b0b235a74

(Please excuse my photo editing… I’m learning lots of new things!)

So, the thumb, pointer and pinky have those kind of fireworks you see pouring down from a bridge.  Thats what I was going for anyway.  the middle finger is supposed to be a rainbow starburst (better photos below), and the ring finger is where I used my Konad Stamping stuff.

WHAT STUFF DID I USE?

A base coat and a top coat are essential, to protect your nail and protect your final design.  You’ll also need a subtle sparkly polish, and a glitter striper polish.

11881810004_b06d6e2f23

For your base colours, you’ll need a black and a silver polish.

11881653623_fc39829995

I used a rainbow glitter polish with a striper brush, but you could use any colour to give the design your own flavour.

11881656943_bf29e27801

From my Konad stamping set, I used the black, yellow and pink polishes, with the starburst design on plate M8.

11881819114_330f710f60

11881405345_3c7ab9b2f5

11881838324_6a7a261d40

HOW DID I DO IT?

As always, start by preparing your nails.  Give them a file and a clean, and finish with your base coat to protect your nail.

11882272716_c10b32aa26

Then start with your base colours.  Paint all your nails black apart from your ring finger.  Put silver on that one.

11881703013_da5ccd65a5

For the “raining fireworks” look, I used a silver glitter striper polish.  Paint short strokes from the base of your nail towards the tip.  Try and make sure there is more glitter at the base of your nail, and make it look like its fading out as you get closer to the tip of your nail.

11881699863_941d9516c0

11882264536_4133e6a0c3

Dip a striper brush into a bottle of rainbow glitter polish, and draw a starburst design on your middle finger’s nail.  You may need to go over this a couple of times to be sure there is enough glitter in the lines to look like fireworks.

11881407865_ac280e275f

Then its time for stamping on our ring finger.  The reason I used 3 colours of polish is to give it that rainbow explosion look.  I started with black, then went over it with yellow, and finished with the pink.  Try and line up the design so the burst starts from the same point each time you stamp it.  (If you’ve never used stamping plates before, there are plenty of great tutorials on YouTube!)

I couldn’t leave it like that, so I put a coat of a very fine glitter polish over the top.

11881662943_bd23f19c67

Finish with a top coat over all your nails, and there you have it!  This design could be used for any occasion, and you could change the colours to suit your favourites.  It gave me a great vibe for the New Years Eve spirit!

11882241106_63c0898f9c

I’d love to hear your feedback and see your versions of this design!  You can contact me on Facebook at http://www.facebook.com/michellesmanis

Thanks for reading.  Happy New Year!

Love Michelle xox

This year for Halloween I decided to go as something iconic and old school… and the old story of Jekyll & Hyde came to mind.  I jumped online looking for costumes and make-up ideas, but there was hardly anything out there!  So, I ended up getting different bits and pieces of inspiration from all over the place and put it together to make my costume.

As there is hardly anything out there for a Jekyll & Hyde costume, I decided to extend my first official blog post to include my whole costume, not just the nail art I did.  So firstly, lets start with the nails…

~~ NAILS ~~

First, always start with clean, dry nails.  I always wash my hands after using nail polish remover to make sure there’s no remaining liquid effecting my nail art.  Prep your nails how you wish (filing, buffing etc) and then start with a clear base coat to protect your nails.

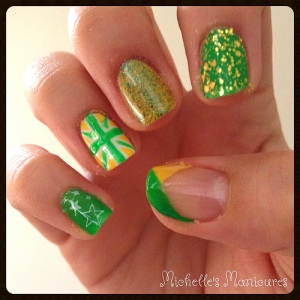
On the “Hyde” side, start with brown as your base colour.  I did 2 coats of this.

image

Then, once this is completely dry, use a black crackle polish.  Be quick with this as most crackle polishes start to dry and crackle really quickly as soon as they come off the brush.

image[1]

This looks a bit strange on its own, but with the costume it looks pretty cool.

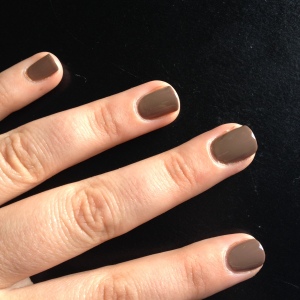
You need to seal your design with a clear top coat, but we don’t want our nails to be too shiny and “pretty”, so you want to use a clear matt top coat to take away the shine.  In the picture below you can see the difference.  On the left is with the matt top coat, and the right is without.  

image[4]

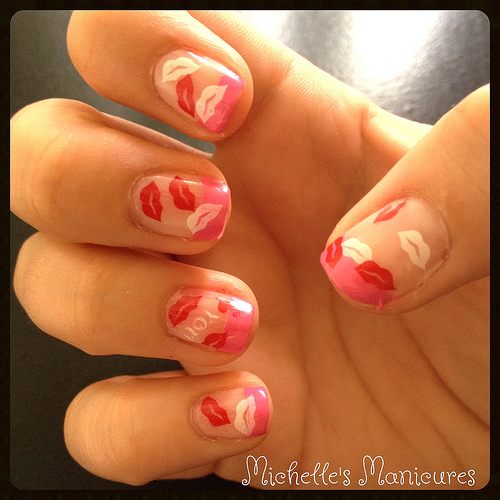
Now for Dr. Jekyll.  Start with a base coat, and then use a sheer pink French polish all over your nails.

image[2]

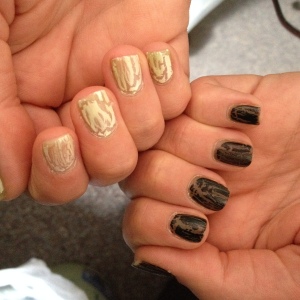
You can hardly tell that I have nay polish on this hand, but that’s kinda the point.  I used 2 coats.  Then, I used a white crackle polish.  I did this to make my nails more similar and contrasting… and also because I couldn’t stand having my nails look that boring!

image[3]

Once that’s dry, finish with your matt top coat and you’re done!!!

photo

~~ HAIR AND MAKE-UP ~~

You’ll have to forgive me for not taking too many photos while I was getting ready.  I was half making it up as I went a long, and half rushing to get to a Halloween party!  But I did take SOME photos, so you’ll get to see bits 😀

Firstly, my hair.  Another reason why I decided to dress as Jekyll and Hyde is because I have short hair so I could dress like a dude without needing to do much to my hair!  If you don’t have short hair, you could still easily do this look.  Jump on YouTube and find the Jekyll & Hyde musical starring David Hasselhoff as Jekyll & Hyde.  He has long hair and it works really well.  Or, alternatively, you could go as Dr Jekyll and MISS Hyde, and sexy up your costume a bit.

So, straight after the shower, I parted my hair (rather than letting my fringe dry over my forehead).

image[5]

Then I used BedHead’s Superstar Thickening Spray and put a heap of that onto my roots on the Hyde side.  This stuff is great for boofing up your hair, and I used to use it all the time when my hair was longer.  By doing this while your hair is still wet, you can mess it up so it dries with a dishevelled look.

image[6]

Then, when my hair was completely dry, I used my hair straightener to bring some pointy bits of hair over my eye on the Hyde side.  On the Jekyll side, I used gel to help it stay behind my ear.  Sorry there’s no photos of this… but you can see what it looks like in the other photos.

~~ MAKE-UP – DR JEKYLL ~~

Now onto make-up, and I’ll start with the ‘easy’ side.  I was going for a manly look, so if you’ve decided to be a female version you can skip this step and just put on your regular make-up on the Jekyll side of your face.

The first thing I did was use a brown eyebrow pencil to make my eyebrow look less shaped and feminine.  Then I applied a foundation which was way to light for my skin colour.  I wasn’t going for a dead look, but I wanted to cover up my blemishes and provide a better contrast.  I used a red lip liner and used that along my top and bottom lash lines, to make my eyes look tired and slightly aged.  Then, I ripped a make-up sponge in half and, using the ripped edge, dabbed on a brown face paint to add a 5 o’clock shadow.  Using the ripped edge means the paint goes on more randomly, and doesn’t look like you’ve just painted on a beard.  I used a nude lip colour to take the pinkness out of my lips, and used a small amount of blush on my cheeks to give them a little bit of colour.

  image[9]image[12]

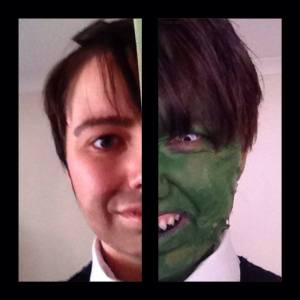
~~ MAKE-UP – MR HYDE ~~

Now, creating Mr Hyde was fun!  Not all my ideas worked, but it was fun working through them!

Start with a coloured contact in your Hyde eye.  I used white, because that’s what I had.  You could use red or yellow.

With a white eye-liner pencil, I decided to draw veins on my face.  I wanted to have a popping veins look.  It looked kinda cool.

image[7]

I mixed up a home-made prosthetic gel, an idea I found on YouTube.  I’ll link the video to BeautyByBrig Here so you can make your own.

Drizzle the gel onto a plate to create some lines.  It’s easier doing this than trying to drip it on your face… trust me!

image[8]

The gel peels off really easy once it’s dry.  Use a little of the heated up gel as glue to stuck the lines to your face along where you’ve traced with the eye-liner.

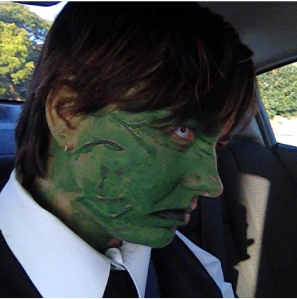
Then, cover this half of your face with a green face paint.  Use a black eye shadow for shading, black eye-liner for wrinkles, and black lipstick for your lips. I also went over the veins lightly with a deep purple eye-liner.  If you didn’t want to use the prosthetic gel, you could just use the purple eye-liner or a face paint and a thin brush to draw on your veins.  I also used a black tooth varnish to black out my teeth a bit and make Hyde look just that little bit more creepy.

                                        image[10]

image

~~ COSTUME ~~

Now, this is the section I don’t have any pics for.  But there were plenty of pictures taken at the party, so I’ll use them!

My costume was pretty easy.  I just wore a suit I concocted from black pants, white shirt, black vest and a black tie.  I wore my cons because I didn’t want to go and buy a pair of shoes just for the costume.  When am I gonna wear black school shoes again?!  I also had a top hat and a monocle which I bought from a  costume shop, and for a prop I had a beaker.  I did start the night out drinking from this, but it would have been better if I had a straw, so I stopped.  Haha.

And here are some pictures from the night!

554677_10151700284096314_724427627_n

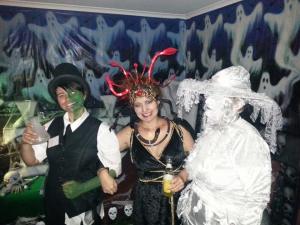
In this one I’m with my cousin, dressed as Medusa, and my Auntie dressed as a ghost.  I’ve got my beaker!  Cheers!!

1382869_10151700280936314_302379703_n

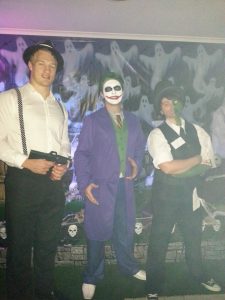
And in this one I’m with my brother dressed as The Joker, and his mate dressed as a good ol’ gangsta.  I tricked a lot of people as they thought I was actually a guy!

Thanks for reading my first blog!  I hope it helps someone in the future if they decide to dress as Jekyll and Hyde for Halloween or another fancy dress occasion.

994926_10152052205624179_1727336108_n

Love Michelle xx

Hello!!

Posted: October 29, 2013 in Uncategorized
Tags:

Hi!  And thanks for having a look at my first attempt at a blog!

This blog is going to be the place where I show off my attempts (sometimes good, sometimes not) at nail art designs.  I’ll also show you the products I’ve used, and tell you what I did so you can create your own versions yourself!

Be sure to add me to your RSS Feed Reader, to keep up-to-date with new posts when I do them.

Thanks again for popping in… and stay tuned!

Snapshot_20131029

Love Michelle xx